Paint-in Lesson Projects for the regular meetings.
When: 4th Wednesday
Where: First United Methodist Church "Gathering Room, on Chancey St., Enterprise
Time: 9:00 am - 4:00 pm
January 28, 2015
Practicing Pressure & Comma Strokes
Based on dsigns by Maureen McNaughton
taught by Sheila Hagler
Published in The Brushstroke Handbook
Surfaces: Greeting cards and bookmarks - will be supplied.
Palette: DecoArt Americana Acrylics
Williamsburg Blue, Winter Blue, Blue Chiffon, Baby Blue, Victorian Blue, Cool White, White Wash, Golden Stray, Pineapple, Taffy Cream, Celery Green, Limeade, Light Avocado, Soft Sage, Arbor Green, Reindeer Moss, Midnight Green, Medium Green, Soft Peach, Peaches and Cream, Coral Rose*, Blush Flesh*, Baby Pink, Cranberry Wine, Deep Burgundy, Red Iron Oxide, Rockwood Red, Country Red, Burnt Sienna, Honey Brown, Dove Grey, Graphite, Payne’s Grey, Soft Black.
* Please bring these colors if you have them.
Brushes: #4 and #6 rounds, # 5/0 and # 0 liner
Misc. Supplies: plastic lid from breadcrumbs or coffee can, that can be used to scrape paint off tip of brush.
Regular Painting Supplies: wet palette, or disposable wax palette, brush basin, transfer paper, stylus, palette knife, eraser and paper towels.
Prep BEFORE Class: Make Extender - this is a key element needed to make the colors blend properly. If you have some DecoArt Easy Float, combine three parts water with one part DecoArt Easy Float in a clean 2oz squeeze float bottle. If you have trouble I will have extra to share.
February 25, 2015
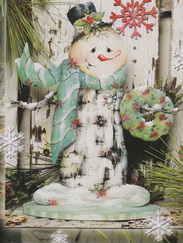
Marie Loucks – Birch Bark Snowman – Acrylics
- Jamie Mills Price – “Christmastime 7, A Wintry Heaven”
Surfaces: Vallhalla – Snowman cut-out or Corners Plaque
Palette: DecoArt SoSoft Acrylics Bleached Sand Hauser Light Green Fawn
Crimson Tide Midnite Green Honey Brown
Burnt Orange Plantation Pine Rookwood Red
Burnt Umber Lamp Black Warm White
Glamour Dust – Crystal Ice If you have Snow Tex, please bring it as well.
**Marie will NOT be doing the crackle finish. She plans to have this piece finished when you leave, so be ready to paint at class start time.
Brushes:
Square Wash 3/, ½; Flats 8, 6, 2; Oval Glaze ¼, ½; Oval Dry 8,6; rounds 3, 1; Liners 18/0, 5/0 Filbert comb (rake) 3/16 Filbert 6, Maxine Mop ¾, ½;
Misc. Supplies:
Black permanent marker,
Regular Painting Supplies:
Wet palette, brush basin, masking tape, stylus, and paper towels.
Prep before class: Based coat as follows:
Arms and Hat - Black
Body - Bleached sand
Scarf - Bleached sand
Please Note: If you are painting on the Snowman "Cutout", you should base coat both sides of the Snowman (front & back).
If you have any questions contact Marie at (334) 718-8919 or email at [email protected]
March 25, 2015
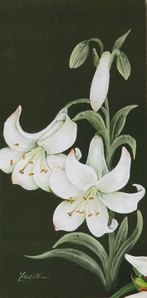
Linda Underwood – “Flowering White Lily” -
Acrylics - Based on design by Jean Zawicki - The Decorative Painter Magazine 2013 #2 – page 95
Surface: 6" x 12" wrapped canvas or surface of your choice
Palette: DecoArt Americana: *Plantation Pine, *Bleached Sand, *Light Avocado, Snow White. Antique Maroon, Brandy Wine (optional) Burnt Sienna, Cool White, Jade Green, Midnite Green. Light French Blue, Bright Yellow, Baby Blue (or Delta Blue Jay). Those marked with * are the most used. Other colors use minute amounts. I have all the colors and will share. I did not use Charcoal Grey as listed in the Decorative Painter article.
Brushes: #8 Flat, 1/4" Angle, 1/2" Angle, #4 Filbert, #0 Long Liner, #10/0 Short Liner
Techniques taught: S Strokes, Water droplets, Wash techniques, Defining and fading veins, pattern refining, reflective light, tinting, floating techniques, how to achieve sheer floats, using enhancing mediums.
Prep Instructions:
Paint background with DecoArt Plantation Pine. I used a 2" foam roller. It may take 3 coats for complete opaque coverage. I usually mix my first coat with DecoArt All Purpose Sealer: Paint - 1:1. Plantation Pine is a semi-opaque color.
Enlarge/reduce pattern to fit your surface.
Transfer pattern, excluding stamens and pistil, to surface. Pattern is designed to have one petal extending around onto the side of a stretched canvas. Depending on your surface, you may want the petal to just go off the front edge and not wrap or may want to shift the pattern to get the petal edge on the front. You may need to adjust that petal (re-draw) if shifting places your right side too far over. Let me know if you do not have the magazine and I'll email you the pattern.
April 22, 2015

Linda Underwood – “Spring Iris” - Acrylics - by
Jean Zawicki - The Decorative Painter Magazine 2014 #1 – page 107
Surface: 6" x 12" wrapped canvas or surface of your choice
Palette: DecoArt Americana: Antique Maroon Baby Blue Bleached Sand Brandy Wine
Citron Green Cocoa Cool White Deep Midnight Blue
Golden Straw Jade Green Light Avocado Midnite Green
Ocean Blue Plantation Pine Taffy Cream Snow White
I have all the colors and will share. I did not use Charcoal Grey as listed in the Decorative Painter article.
Brushes: Angles ¼ and ½; Filberts #4 and #6; very fine liner, 10/0, 18/0, or 20/0
Techniques taught: S Strokes, Water droplets, Wash techniques, Defining and fading veins, pattern refining, reflective light, tinting, floating techniques, how to achieve sheer floats, using enhancing mediums.
Prep Instructions:
Paint background with DecoArt Plantation Pine. I used a 2" foam roller. It may take 3 coats for complete opaque coverage. I usually mix my first coat with DecoArt All Purpose Sealer: Paint - 1:1. Plantation Pine is a semi-opaque color. Please do not basecoat the flowers or leaves or apply any other paint to the background except the Plantation Pine.
Enlarge/reduce pattern to fit your surface.
Transfer pattern, excluding stamens and pistil, to surface. Pattern is designed to have one petal extending around onto the side of a stretched canvas. Depending on your surface, you may want the petal to just go off the front edge and not wrap or may want to shift the pattern to get the petal edge on the front. You may need to adjust that petal (re-draw) if shifting places your right side too far over. Let me know if you do not have the magazine and I'll email you the pattern.
May 27, 2015
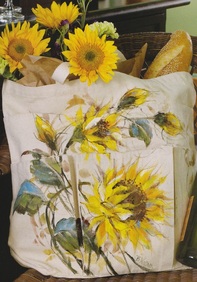
Patty Pfund – Sunflower Canvas Tote by Beth Wagner
published in PaintWorks October 2010
Page 32
Surfaces:
Canvas Tote, Apron, Brush Case, or Fabric Surface of your choice
Palette: DecoArt SoSoft Acrylics
Antique Gold Hauser Dark Green
Burnt Sienna Hauser Light Green
Cadmium Orange Island Blue
Cadmium Yellow Lamp Black
Dark Chocolate White
Brushes:
#4 Round, #6 & #10 Shader and a Liner
Misc. Supplies:
Black permanent marker, black charcoal pencil for light fabric or white charcoal pencil for dark fabric
Regular Painting Supplies:
Wet palette, brush basin, masking tape, stylus, and paper towels.
Prep:
1. Wash the bag to remove sizing, DO NOT use fabric softener or dryer sheet.
2. With the wax side against the fabric, iron freezer paper to the back side of your fabric. This keeps
the paint from bleeding through to other parts of the bag. Secure the bag to a board using masking
tape or pins to keep the fabric taut. I used a piece of foam board cut to fit inside my bag.
3. Trace the pattern on tracing paper, then turn the pattern over and go over the pattern lines
with a charcoal pencil.
4. Place the pattern on your fabric, and rub over the pattern lines with the end of your brush,
stylus or pencil to transfer the pattern to your fabric.
5. Cover the back of your bag AND anywhere that there is no design with Press & Seal. This
protects those areas from accidentally dipping or smearing into paint.
If you have any questions contact Patty at (334) 393-7709 or email at [email protected]m
June 24, 2015
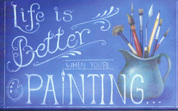
Betty
Fergus – “Life is Better When You’re Painting” - Chalk Paint- Judy Westegaard, CDA from
her book “Chalk It Up” book.
Surface: wire tray wood insert/wire tray Viking Woodcrafts #155-0028 18” X 12” or surface of choice
Palette: DecoArt Americana Paints
Admiral blue Canyon orange Honey brown Sapphire White
Bt Umber Cool neutral Mississippi mud Soft black Williamsburg blue Black Crimson tide Prussian blue Uniform blue Yellow ochre
Brushes:
1 flat brush (or largest one you have), and a large mop brush
¼”, ½”, ¾” angles
10/0 detail liner
Small dome round or whatever brush you us for dry brushing
Misc. Supplies:
DecoArt drying time extender
White charcoal pencil, tortillon, small pencil sharpener
Krylon workable fixatif
Prep Instructions:
Base coat surface with Deco Americana sapphire. The outer edge of this surface needs to be shaded. This is done by covering the surface with extender and floating along the outside edge with Admiral blue. You can use a large mop to soften the edges. Deepen with Prussian blue, if needed. Lighten the area on the background where the word “Painting” will be with a mix of sapphire and a little white. Blend edges with the mop brush.
When surface is completely dry, put on pattern of just pitcher and brushes, leave the words off until all of the painting is done.
Basecoat:
Pitcher – Williamsburg blue
Brush Handles To Left Of Palette Knife (just wooden part, not ferrules)
Fan brush – Cool neutral
Large round – Crimson tide
Pointed round – Soft black
Flat – Admiral blue + touch of Soft black
Brush Handles To Right Of Palette Knife
Round (right of pencil) – Soft black
Pointed round on right – Crimson tide
Palette Knife – handle –Bt umber, brass on handle – Yellow ochre
Pencil – handle – Yellow ochre, sharpened end – Cool neutral
Ferrules – light ones + palette knife metal – Williamsburg blue + White 1:1, dark one on fan brush – Admiral blue + touch Black
Please have all of the above complete BEFORE class.
If you have any questions, contact Betty Fergus at 334-347-6939 or [email protected]
July 22, 2015

Joretta Parker – Flower or Butterfly - based on design by Debra L. Welty, TDA - on any fabric surface.
If you have any questions, contact Joretta Parker at 334-393-2191 or [email protected]
August 26, 2015
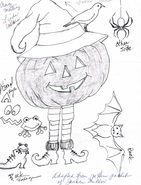
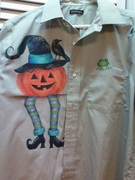
Linda Sellars – “Halloween Design” - Fabric Paint on shirt based on a Pattern Packet by Janice Miller
Surface:
Fabric of choice, shirt, canvas bag, apron, brush case, etc.
Palette: DecoArt SoSoft Fabric Paints
Black Dark Chocolate
Bittersweet Chocolate Dioxazine Purple
Cadmium Orange Hauser Light Green
Cadmium Yellow Indian Turquoise
Christmas Green White
Misc. Supplies:
DecoArt Transparent Medium
Prep. Instructiions:
Have your shirt washed and ironed and pattern on. Do not use fabric softer or sheets. Iron freezer paper on the back and put on a board.
September 23, 2015
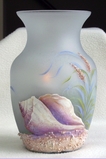
Betty Fergus / Gaynelle Mixon - vase with shells - “Seychelles Votive Vase” - Acrylics - pattern packet by Laure Paillex
October 28, 2015
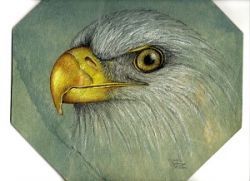
Kimberli Fougeron - “Bald Eagle” by Janelle Johnson, CDA, TDA
A note from Kimberli: I have used colored pencils for years to make patterns for stained glass projects. I found people have a hard time visualizing a piece without colors. I also enjoy coloring with pencils with my grandson. The artist comes out in him and even at six he likes the “professional” look. Instead of the colorless blender I have used tissues and Q-tips.
Those of you wanting to do the Bald Eagle 2003 by Janelle Johnson will need to go on line and purchase the E-packet from: www.janellejohnson.com .
Janelle Johnson’s project is decoupage onto a wood plaque. We will not be doing that. I will provide 6”x8” black paper which I found that the head shows up and fits on nicely and allows you to put it in a card stock frame later. She provides you with a list of colors but I found as long as you have a variety of grays and yellows and at least basic white, brown, and black you can get the desired results without the exact colors listed. I am a firm believer in using what you have. You should have at least a basic color pencil kit in your tools of the trade.
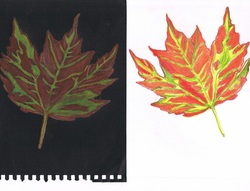
I am not doing a rose, however if you don’t want to buy the packet for the Bald Eagle I have found a fall leaf that has no copy write restrictions as long as I promote: Colored Pencil Basics by Cynthia Knox. It fits nicely on white paper I will provide.
I will be going over color pencil basics and will provide paper to practice on.
All you need to bring is your color pencils. Relax and have a no stress fun time.
You will need:
· Hand-held pencil sharpener and something to put shavings in.
· Grey graphite paper
· Stylus for transferring the design
· A soft brush to dust off the project.
· White and black permanent parkers fine tip
· Colorless blender
· Erasers both black and white ones. Kneaded erasers seems to lift of color.
· Bring what color pencils you have. (Always sharpen new color pencils with and electric sharpener the first time. Hand-held is fine after that.)
THURSDAY, November 19, 2015
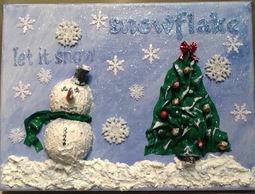
Snowflake - A Multi Media Project
THURSDAY, November 19, 2015
designed & taught by Marie Loucks, CDA
Surface & Palette Provided for a Fee
Surface & Palette Fee: $14.00*
PREPAID before November 11, 2015
*This includes ALL materials needed to do this project.
There will be not be any "prep" necessary for this class. Just come ready to paint & have FUN!!
Misc. Supplies: old brushes, palette knife, water container for clean-up, paper towels and a pair of tweezers
To sign up for this project, prepay or ask questions, please contact:
Marie Loucks
[email protected]
104 Coronada St.
Enterprise, AL 36330
December 9, 2015
WDP Christmas Party
Come Party With Us
Where:
Marie’s House
When:
Dec. 9 at 11:30 A.M.
Admission:
1 Hand Painted Ornament + 1 Dish to Share
Mission:
To have fun, install Officers, and plan next year's projects. So bring several projects you would like to paint next year. Our projects are what makes our club GREAT so help with the planning.
R. S. V. P: To Marie by December 2nd.
She needs to know how many people will attend and what dish you will be bringing.
Marie Loucks
[email protected]
104 Coronada St.
Enterprise, AL 36330
